How to Make Aloe Vera Hair Oil
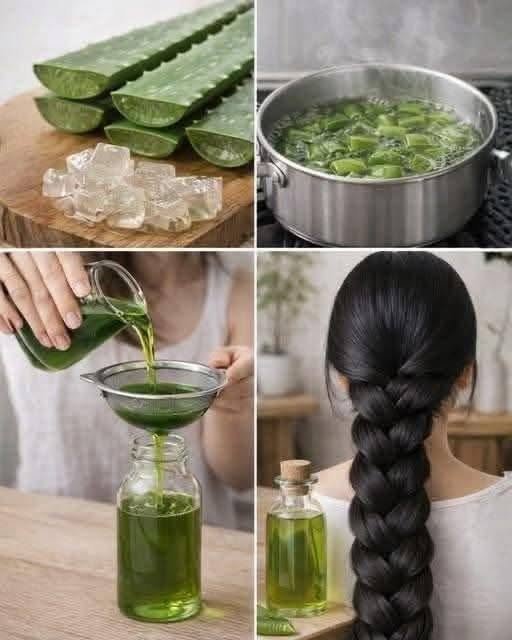
Step 1: Prepare the Aloe Leaf
Wash the aloe leaf thoroughly.
Trim away the ends and stand the leaf upright in a container for approximately 15 minutes to allow the yellow latex to drain.
Rinse the leaf again before removing the green outer layer.
Step 2: Extract the Gel
Using a clean knife or spoon, carefully remove the transparent aloe gel from inside the leaf.
Cut the gel into smaller pieces. Avoid including pieces of the green outer skin.
Step 3: Combine the Ingredients
Place the measured carrier oil into a small saucepan over low heat.
Add the prepared aloe gel.
Keep the temperature low and stir gently from time to time.
Step 4: Cook Slowly
Fresh aloe contains a significant amount of water, so the mixture may bubble as moisture is released during heating.
Continue cooking gently until the visible bubbling has substantially stopped and the aloe pieces become smaller and darker.
Do not use high heat, as excessive temperatures can cause the oil or botanical material to burn.
Step 5: Strain the Oil
Remove the saucepan from the heat and allow the mixture to cool sufficiently for safe handling.
Carefully strain the oil through a fine-mesh strainer or clean cheesecloth to remove the remaining aloe solids.
Step 6: Store Properly
Transfer the strained oil into a clean, completely dry glass bottle.
Keep the bottle tightly closed and store it in a cool, dark location.
Because homemade preparations do not contain commercial preservatives, maintaining clean equipment, minimizing moisture, and monitoring the oil for changes in smell, appearance, or texture are important.
Coconut Oil vs. Olive Oil
The choice of carrier oil depends largely on your hair type and preferred texture.
Coconut oil tends to be a popular option for hair-conditioning treatments and can work particularly well for strands that benefit from a richer oil.
Olive oil has a heavier, more emollient feel and may be preferable for dry, coarse, or highly textured hair.
You can experiment with either option and determine which feels most comfortable for your hair and scalp.
How to Use Aloe Vera Hair Oil
Before applying the oil throughout your scalp or hair, perform a small patch test on the skin and wait to see how your skin responds.
If there is no irritation, apply a small amount of the oil to the scalp or hair lengths.
Massage gently with your fingertips and leave it on for a period that suits your routine before washing thoroughly with shampoo.
Avoid applying homemade aloe preparations to broken, irritated, or damaged skin.
Potential Benefits of a Homemade Hair Oil Routine
Regular hair oiling is commonly used as part of personal hair-care routines to help condition dry strands and reduce the feeling of roughness.
Aloe vera and plant oils may help make hair feel softer and more manageable, particularly when used appropriately for the individual’s hair type.
However, a homemade aloe vera oil should be viewed as a cosmetic hair-care treatment, not as a guaranteed treatment for hair loss, scalp disease, or other medical conditions.
Storage and Safety Tips
Homemade botanical oils require careful handling.
Always use clean, completely dry equipment and avoid introducing water into the finished oil. Store the preparation in a clean, sealed container and inspect it before every use.
If you notice an unusual odor, visible mold, significant changes in appearance, or other signs of spoilage, discard the preparation rather than using it.
People with sensitive skin or known allergies should be especially cautious with homemade topical products.
Final Thoughts
Aloe vera hair oil is a simple way to combine the familiar conditioning properties of aloe vera with a nourishing carrier oil such as coconut or olive oil.
The preparation requires only a few ingredients, but careful handling is essential—particularly when working with fresh aloe and homemade oil mixtures.
With proper preparation, clean equipment, sensible storage, and a small patch test before use, this botanical hair-care treatment can become a simple addition to a natural scalp and hair care routine.
For Complete Cooking STEPS Please Head On Over To Next Page Or Open button (>)