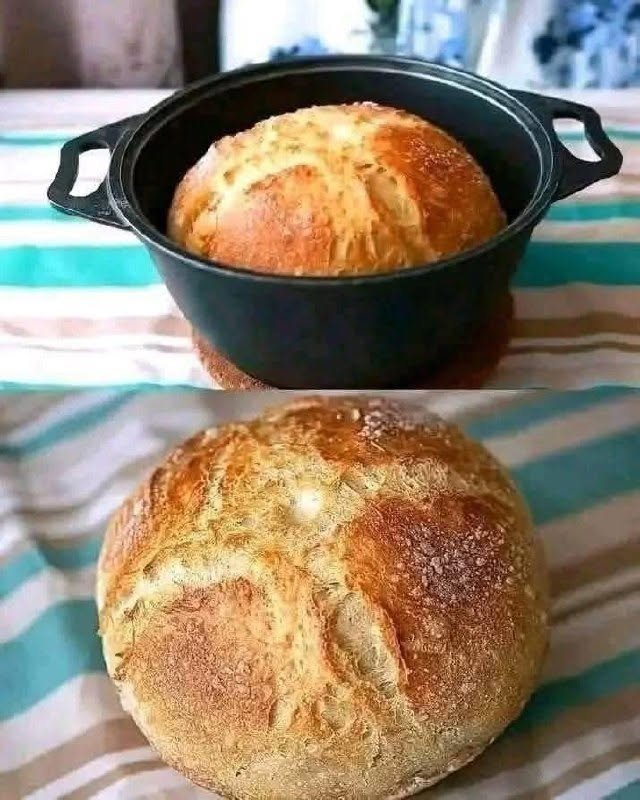
5. Bake the Bread
Carefully remove the hot Dutch oven from the oven.
Using the parchment paper as a sling, lower the dough into the pot.
Cover with the lid and bake for approximately 30 minutes.
The covered environment traps steam released from the dough, helping the loaf develop a beautifully crisp crust.
6. Finish Baking Uncovered
Remove the lid and continue baking for another 10–15 minutes, or until the bread develops a deep golden-brown crust.
Keep an eye on the loaf during the final stage because oven temperatures and baking times can vary.
7. Cool Before Slicing
Carefully transfer the bread to a wire cooling rack.
Allow it to cool completely before slicing.
Although the aroma may make it tempting to cut immediately, allowing the loaf to cool helps the interior finish setting and produces a better crumb.
The Secret Behind No-Knead Bread
Traditional bread recipes often rely on kneading to develop gluten.
No-knead bread takes a different approach.
Instead of extensive mechanical mixing, the dough is given a long fermentation period. Time allows the flour and water to develop gluten naturally, creating the structure needed for an airy loaf.
This makes the recipe particularly appealing to beginners who want homemade artisan bread without complicated bread-making techniques.
Why a Dutch Oven Creates a Crisp Crust
A Dutch oven is one of the most useful tools for making crusty homemade bread.
As the dough heats, it releases moisture. The covered pot traps that moisture and creates a humid environment around the loaf.
This steam helps the bread expand during the early stages of baking while encouraging the development of a thin, crisp crust.
Removing the lid near the end of baking allows excess moisture to escape and helps the exterior become beautifully golden and crunchy.
Tips for the Best Rosemary Artisan Bread
Don’t add too much flour. A sticky dough is normal for this style of bread. Adding excessive flour can make the finished loaf dense.
Give the dough enough time. The long rise is an important part of developing both flavor and structure.
Handle the dough gently. Preserve as many of the air bubbles as possible when shaping.
Preheat the Dutch oven thoroughly. A hot baking vessel helps create strong initial oven spring and a crisp crust.
Use fresh rosemary when possible. Its aroma is particularly noticeable in freshly baked bread.
Let the bread cool. Cutting too early can make the interior appear gummy.
How to Serve Rosemary Artisan Bread
This rustic loaf is incredibly versatile.
Serve warm slices with:
- Butter
- Olive oil
- Balsamic vinegar
- Garlic butter
- Soft cheese
- Creamy soups
- Tomato soup
- Fresh salads
- Roasted vegetables
- Pasta dishes
It also makes excellent toast and can be used for sandwiches, bruschetta, or homemade croutons.
Storage
Once completely cooled, store the bread at room temperature in a breathable bread bag or wrapped loosely in a clean kitchen towel.
Avoid storing crusty bread in the refrigerator, as refrigeration can cause the texture to become stale more quickly.
For longer storage, slice the cooled loaf and freeze the slices in a freezer-safe container or bag.
Final Thoughts
This Rustic Rosemary Artisan Bread proves that impressive homemade bread doesn’t require complicated equipment or advanced baking skills.
With simple ingredients, a long fermentation, gentle handling, and a hot Dutch oven, you can create a loaf with a crisp golden crust, airy interior, and wonderful rosemary aroma.
Whether served alongside dinner, dipped into olive oil, or enjoyed simply with butter, this easy no-knead artisan bread recipe is a delicious addition to any homemade meal.
Frequently Asked Questions
Can I make this bread without a Dutch oven?
A Dutch oven provides an excellent steaming environment, but another oven-safe covered baking vessel may also work if it can safely withstand high temperatures.
Can I use dried rosemary?
Yes. Fresh rosemary provides a stronger fragrance, but dried rosemary can be substituted when fresh herbs aren’t available.
Why is my dough sticky?
No-knead artisan bread commonly has a relatively wet dough. Resist the temptation to add large amounts of flour, as this can result in a heavier loaf.
Why should the bread cool before slicing?
Cooling allows the interior structure to finish setting. Slicing immediately can release steam and affect the final crumb texture.
What flour works best?
Bread flour can provide a slightly chewier structure, while all-purpose flour works well for a lighter rustic loaf.
For Complete Cooking STEPS Please Head On Over To Next Page Or Open button (>)